Showing posts with label DIY. Show all posts

Monday, November 16, 2009

Mission Abandoned: Floral Favors

Yes, you read that correctly...mission abandoned!
Well, not completely. Just the flower portion. Someone here ran out of DIY steam. :) But, honestly, they were just too putzy and time-consuming. I'm okay putting that much time into, say, the invitations or the dress, but not into silly little tissue paper flowers!

So, the guests will be getting their Smarties sugar buttons in their pink or orange plastic shot glass, and they'll be happy with it! :)

Ciao,

Thursday, October 29, 2009

Mission Accomplished: Table Numbers

Now that the invitations are nearly complete, I must occupy my time with another project... ...table numbers!

As you may have noticed, this design was also used for our card box. It was adapted from Martha Stewart's table number template. Sure, the border is the same, but the font is different (I used the same Edwardian Script ITC font I used for the Save the Dates, invites, and card box...so far...). Also, Martha's table numbers only went up to 20, and we will have at least 23 tables.

I am excited to see these table numbers in action! I finally plotted out the reception layout, coordinating the colors of the table numbers, menu cards, table runners, and candle/flower centerpieces. Yikes!

Ciao,

Friday, October 23, 2009

Mission Accomplished: Pocketfold Invitations

Invitation making is in full swing now, and I'm already about halfway through!
I have about three weeks to finish the rest of the invitations, but I hardly think that will be a problem now that I've got my system down! :) Here's a little rundown on my invitation assembly line...

1. Take an 8.5" x 11" sheet of cardstock (I'd recommend at least 100 lb. cover cardstock for optimal strength) and measure 4" from one side and 2" from the other.

2. Fold the cardstock along the lines you've marked off. (I used this laminated math formula cheat sheet to help me fold in a straight line!)

3. Trim 1.5" from the top of the piece of cardstock. This will create a 5" x 7" invitation when folded (11" x 7" when fully open), which will fit perfectly in an A7 envelope (more on those later).

4. Don't just throw this little strip away though! Trim another 0.5" off of it (so it's 1" thick), and set it aside to use as a belly band for the orange invitations.

5. Next, take another 8.5" x 11" sheet of cardstock and cut out two 5" x 4.75" pieces. These will be used to make the pocket of the pocketfold invitations. I saved the rest of the cardstock to use for the placecards I will be making later on.

6. The next step is to make the flaps of the pocket so it can be attached to the invitation. So, measure 0.5" from all sides except the top.

7. Then, fold the flaps over where marked. Again, I used my handy-dandy math formula cheat sheet to fold them.

8. To make the corners of the pocket, it's necessary to snip of the excess cardstock. So, fold the corners and snip away!

9. Then, to attach the pocket to the invitation, I used glue dots on the corners and a glue stick on the edges.

Here's what the pocketfold invitation looks like without any of the text or inserts added yet. Pretty fabulous, eh?

10. Next I glue-stuck the invitation and reception cards to the invitation.

11. Then I inserted the direction and response cards into the pocket.

12. For our out-of-town guests, I added a "Travel Information" card. I actually like the look of the invitation with the third card in the pocket, but I figured it was unnecessary for the local guests.

13. Next up were the belly bands! Remember the strip cut off from the top of the invitations? Well, here they are in action! After affixing the monogram with a glue dot, the belly bands were slipped into place.

14. The invitations were then placed in an envelope of the opposite color. Then, envelope wraps were glue-stuck (new favorite verb!) on.

Here's a view of the back of the envelope. That's our return address on the back. :)

15. This is my favorite step - adding the completed invitation to the "done" box! :) I'm trying to keep them separated - the stacks on the left are those with the "travel information" insert and the stacks on the right are those without. I'm not sure if there will be a difference in postage, but it'll be so much easier if there is!

Ciao,

Friday, July 24, 2009

Another Way to Jazz Up My Invites!

Now that I've sent out the first batch of Save the Dates, I'm ready to start on the invitations. Well, I've technically started over a year ago, but I do have a new development! The envelope wrap! Here's a fab design I found over at The Fussy Designer!

Unfortunately, the second picture doesn't show much, but that's where you'd put the return address.

There are a plethora of colors available, including this fabulous orange one, but sadly there were no pink ones! So, what's a pink-lover to do? Make her own, of course (or at least recolor one of them)! After a bit of time in Paint and Microsoft Publisher, I was able to make the pink one!


Now to decide whether to hand-write or type the addresses on them. I know hand-writing them makes them seem more thoughtful, but I'm not sure anyone really even cares about how their name was written on the envelope. I mean, would you feel snubbed if your name wasn't hand-written? Decisions, decisions...

Ciao,

Tuesday, June 16, 2009

Invitation Envelopes

While I'm waiting for my mom and Steve's mom to provide us with the addresses for our Save the Date cards, I've been busy thinking about the invitations! One of the latest additions to our To-Do List from The Knot is to order our invitations, so I feel like I need to get on board with their design!

I was hoping to get away with folding the cardstock in such a way that it could be an envelope in and of itself, like this example...
That way, I could save money on envelopes and the presentation would still be super cute! The only problem is that I usually see this style inside of another envelope, like this...
Is there some sort of invitation etiquette that I'm missing out on?!?

Now that I've come to terms with the fact that I'll need envelopes, the mission has been to find the cutest ones at the lowest price! Here's what I've found...


At just $1.09 each, they're a pretty good deal! :) While they may be the most expensive part of the invitation, I think they'll be a nice touch.

*Edit: I take back every single time I've ever said how much I love math and how it was my best subject in school! The envelopes are only $0.11 each! Hehe, forget to carry the decimal over two places!*

If worse comes to worse and I don't want the added cost, I'll either just found some simple white envelopes or try my idea of using the invitation itself as an envelope.

As far as sizes go, I will probably go with the A7 envelope, which will fit a 5" x 7" invitation. Not too big, not too small! Since we are sending about 115 invitations and 115 thank you cards (230 total, if you do the math!), we'll probably get three boxes - 2 pink and 1 orange. Hehe, I always have to overdose on the pink!

Ciao,

Friday, June 12, 2009

Duty Sheet: Maid of Honor

Here's my next installment of the duty sheet - this time for the maid of honor!
(click to enlarge)

It's pretty similar to the duty sheet for the bridesmaids, but, obviously, tweaked slightly for the Maid of Honor's additional roles, such as holding my bouquet during the ceremony or giving a speech during the reception dinner.

Ciao,

Monday, June 8, 2009

Duty Sheet: Bridesmaids

One of the overdue items on my to-do list is to make sure our bridal party knows what is expected of them. While I did discuss this slightly with my MOH, we agreed that having something written down would be much easier to remember!

I will be putting together a "duty sheet" for the MOH, bridesmaids, best man, and groomsmen (assuming Steve approves of this!), but I thought I'd start with the bridesmaids...
(click to enlarge)

I tried to keep it short so it won't get too overwhelming! Equipped with their "duty sheet" and wedding itinerary, the bridesmaids should be on top of everything!

Ciao,

Wednesday, June 3, 2009

Invitation Iterations

Although I still need to finish the Save the Dates, I'm already thinking about the invitations! Honestly, though, I've been thinking about them for some time! I think I've gone through about five completely different iterations so far...

From a purple and blue (yes, I said purple and blue...told you they'd be completely different!) version of this vintage-inspired invite...

to a pink and orange version of this elegant stationary...

My latest (and hopefully final!) iteration mimics the Save the Dates with the damask stamping technique. Although, I may get a little fancy and use embossing powder! Here's what I had in mind...
(click image to enlarge)

The response card, which would be about postcard size (which makes sense b/c, well, it'll be a postcard!), would be in a little pocket. I considered adding a direction card as well, but most people these days have access to a computer or GPS, so I figured they can map it themselves! :) Plus, we added a little blurb at the bottom about our wedding website, so guests can go there for directions and such.

I'm not entirely sure how big the invitations will be. I initially considering making them to fit an A2 envelope (4-3/8x 5-3/4"), but now I'm considering making them slightly larger to fill an A7 envelope (5-1/4 x 7-1/4"). But, I won't worry about that until I get Microsoft Office back on my computer and I can start playing around with them again!

*Side note: See the cute little pink blurred out word on the first line? That's my last name. See the much longer pink blurred out word just underneath? That's Steve's last name. Ugh, not looking forward to that name change! :P

Ciao,

Monday, June 1, 2009

The Dress

Now that I'm done with school, I have a bit more time to focus on wedding stuff! I've completed the card box, tackled the Save the Dates, and started on the favors, but I've been neglecting one major project...the dress!

The Background Info
Now, let me tell you, I love fashion! Since I was little, I've been sketching dresses, shoes, skirts, tops, you name it! I'm honestly a little surprised I never went into fashion design, but I always tell myself that I'll pursue fashion design once I become a famous construction manager. :)

I'm also the type of person who knows EXACTLY what she wants! This can be a blessing and a curse, depending on the situation. I can't tell you how many times I've gone shopping with a specific item in mind and had to go home empty-handed because my criteria was too strict! On the rare occasion do I actually find exactly what I've been looking for (like my wedding shoe find!). However, I knew this wouldn't be the case with the dress...


Align LeftSo, with all of that in mind, I decided I was going to make my own wedding dress! I scoured the internet for inspiration, ranging from designer duds on style.com to simply chic dresses from j.crew. It wasn't until I thought back to my favorite dress from Project Runway Season 5 Finale by designer Kenley Collins that I knew how I wanted my dress to look:
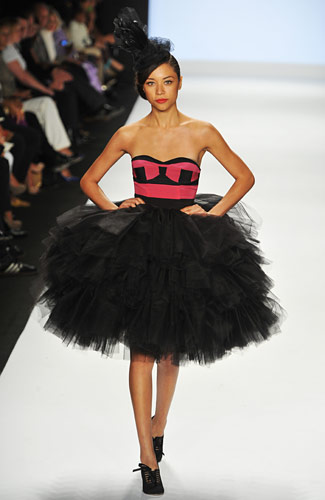
Ok, so my skirt won't be quite as large and the top won't have a geometric pattern to it, but the sweetheart neckline, poofy skirt, and layers of tulle are right up my alley! I'm still a little nervous to even begin the skirt, but I have nearly completed the top...
Ignore the belt - I wanted to show some waist definition (plus, I used it to mark where the waistband above the skirt is going to be).

Unfortunately, the picture above doesn't show the fabulous fabrics, so here they are, up close and personal!
Off-White Silk Dupioni


Off-White Tulle

I've received mixed responses when showing the Project Runway inspiration picture to family and friends, but I'm confident I can, in the words of Project Runway's Tim Gunn, make it work!

Ciao,

Friday, May 29, 2009

Torn with Table Numbers

I have a whole slew of questions to ask our reception site at our next meeting, including "are table numbers included?". I'm guessing not because all the pictures I've seen of the space have had different table number options. So, that leaves me with the task of deciding what kind of table numbers we want! Here are my options...

I like this option because I used the same template for our card box. Will anybody actually make the connection that the table numbers match the card box? Probably not. But, I do like continuity! Plus, they would be relatively easy to make, and they look cute!


These make me smile! Maybe I'm just a photo hog, but I like the idea of being in the picture! Plus, they're so cute and kinda quirky! Rather than holding up a piece of paper with the number on it, I think I like the idea of us standing near the number somewhere around town, kinda like this...
...but with me in the picture! Oh, and Steve... :)

As a bride on a budget, I'm trying to avoid extra costs, like table number holders or frames. So, I like the idea of doing a folded setup, like the last photo. And, with my new printer, I can print them out in all their colorful glory!

Ciao,